Hole Saw Distortion Problems by David Pye
From world famous heat treat consultant David Pye we have this article about distortion in Hole Saws;
We were invited to consult for a manufacturer of hole drill saws to review the current problem of massive distortion and resulting scrap.
The state of production due to distortion of the hole cutter was as high as 75% scrap due to massive distortion results after pressure quenching with nitrogen in a vacuum furnace,
The manufacturer was conducting the procedure in a 5 bar over pressure vacuum furnace
- Material review
The material was supplied in the unusual form of M2 High Speed Steel, friction welded to a low alloy steel for the support body of the completed hole saw. The material was also supplied in the coiled roll. The material test certificate was checked for composition, test (very simply) against the test cert information and found to conform to the test certificate.
- Hole saw manufacturing procedure
The steel roll cutting edge of M2 and Low carbon steel body were de-coiled and cropped to length. Further the top plate was pressed out of low carbon steel and a hole drilled in the center of the punched plate.
Fig 1 Assembled and completed hole saw (Not representative of the hole saw under discussion in this article).

It was observed that when the coiled material was de-coiled and cropped to length, that the cropped piece always had a variation in the actual physical length of crop always had a variance of correct size and up to 0.125 inches.
This meant that the hole saw drill diameter was never actually constant. It further meant that after fold and seam weld. In addition to this, although the punched plate that is carrying the pilot drill bit was maintain its size, it was causing an undue stress in the assembled drill, prior to heat treatment.
- Current Heat Treatment Practice
- Load basket with approximately 100 assembled hole saws in ‘soldier fashion’.
- Load into vacuum furnace.
- Ramp up to the selected austenitizing temperature of 2250°
- Soak at temperature for 20 minutes.
- High pressure quench at 5 Bar over pressure with nitrogen as the quench medium.
- Air recirculation furnace at 1020°F
- Open furnace and inspect the load for distortion ovality.
Review and comments on the current heat treatment procedure.
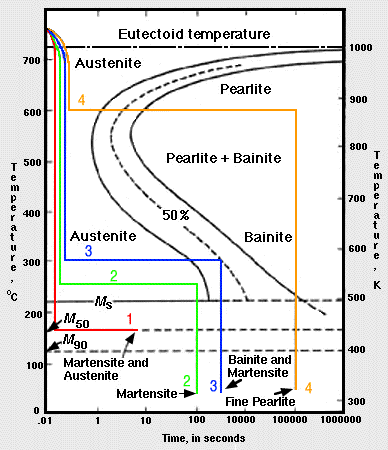
It was established that the Isothermal Transformation Diagram for M2 had been considered, it was clear that the interpretation of the diagram was misunderstood.
It was also discovered by the writer that the understanding of the time necessary for transformation to the Ms line transformation was not considered (or recognized).
The next observation was, that the company did not understand the necessity for accurate austenitizing temperature. (Believing that the higher the temperature, the more uniform the metallurgy of the hole saw would be).
The writer conducted a Design Of Experiment to be used to establish to the client that although that the present heat treat procedure was incorrect, the hole saw manufacturing (crop, bending to form the OD, welding methods) were also influencing the distortion to the slight inaccurate differences on the crop to length.
A batch of 100 hole cutting saws were placed in the load basket for vacuum heat treat, after being measured accurately to note the influences of movement after treatment. Shown below is a comparative heat treatment
process program;
0riginal heat treatment Suggested DOE process
Load vacuum furnace Load vacuum furnace
Preheat by ramp up Preheat by ramp up
Selected austenitize temperature= 2350°F 1975°F
Soak time at temperature =20 minutes 5 minutes
Over pressure N₂ gas quench=5bar (73.5psi) Partial pressure 0.5bar
Remove the load basket from the furnace and check distortion occurrence.
On completion of the measurement comparison, it was seen that the percentage were as follows;
The original heat treatment procedure, from each batch of 100-hole saws an average of 75% scrap was observed in each load.
From the new recipe, the distortion was noted only in approximately 15% as scrap, the corporate management suggested that it was a ‘fluke’.
It was then decided to process a second and third batch of 100-hole saws. This was accomplished with almost the same result as the first alternative suggested new program.
The new focus of evaluation was to ensure as near accurate fit up and to focus on the crop to length procedure.
This was accomplished and the newly suggested heat treatment program conducted once again.
The distortion factor improved once again and processed using the new heat treat program, which produced a scrap rate of + - 5%.

Conclusion
The original program of heat treatment austenitizing temperature was too high to achieve the desired results
The second part of the program of pressure quenching was also too high. One has only to consult the TTT curve for M2, and it will be observed that the ‘nose of the cooling curve’ is far to the right of the transformation and time line at approximately 20 minutes to the Ms line.
Then the crop to length and manufacturing method tolerances were tightened up.
The company is now selling their products, better than ever.
Sincerely, David (Pye Metallurgic al International Consulting)
